Linux OpenVPN 一键自动安装脚本


【下载对应软件】
根据你VPS的系统,下载对应的软件,下载页面为:https://openvpn.net/index.php/access-server/download-openvpn-as-sw.html。
唔,发现上面的地址需要爬墙方能打开,在下面列一些常见系统的软件下载地址:
CentOS 5 32bit:http://swupdate.openvpn.org/as/openvpn-as-1.8.4-CentOS5.i386.rpm
CentOS 5 64bit:http://swupdate.openvpn.org/as/openvpn-as-1.8.4-CentOS5.x86_64.rpm
Ubuntu 10 32bit:http://swupdate.openvpn.org/as/openvpn-as-1.8.4-Ubuntu10.i386.deb
Ubuntu 10 64bit:http://swupdate.openvpn.org/as/openvpn-as-1.8.4-Ubuntu10.amd_64.deb
Ubuntu 10 对应 Debian 6 系统;其他的自行打开上面页面下载。
【软件安装命令】
Debian和Ubuntu软件安装命令:dpkg -i openvpn-as-1.8.4-Ubuntu10.i386.deb
CentOS软件安装命令:rpm -ivh openvpn-as-1.8.4-CentOS5.i386.rpm
【Wget下载和安装】
Wget之类的下载软件,然后用上面的安装命令安装即可。CentOS 5 64bit的安装示例:
1.wget http://swupdate.openvpn.org/as/openvpn-as-1.8.4-CentOS5.x86_64.rpm
2.rpm -ivh openvpn-as-1.8.4-CentOS5.x86_64.rpm
3.passwd openvpn
上面最后一条命令用于设置openvpn帐户的密码,输入2遍。
【管理页面,配置】
安装成功之后,会自动打印OpenVPN的管理地址,和客户端登录地址:
https://ip:943/admin/
https://ip:943/
首先访问https://ip:943/admin/,用户名为openvpn,密码则是下载之后设置的密码。
首先左侧,User Management下面的User Permissions,在openvpn用户名的右侧,有个Allow Auto-login的选项,勾选上。

之后点击下面的Save Settings;当然可以自行添加另外的用户名,但是2个用户的限制,貌似就毫无必要了。


Install OpenVPN on a NAT Server

In this guide we will cover how to install OpenVPN on a NAT based VPS.


Now we have a new NAT VPS, details listed below:


Product: LDN-128

Hypervisor: ldn6-uk

OS: CentOS 6 x64 Minimal


Hostname: ldnNATinstance

Main IP: 192.168.43.243

Shared IP: (see above)


IP Addresses Assigned2a06:8ec0:0000:068e:0000:0000:0000:0001


Connect to your VM and Update

Now from this we can check the external IPv4 to connect and open a SSH window.


Once SSH is open update the OS – “yum update”


yum update command


Enable TUN/TAP

To enable TUN/TAP login to the VPS management panel with your user details and then open the instance you wish to edit.


Management Screen


Once the main VPS page has loaded click “VPS Configuration” and then enable TUN/TAP and click submit, once the changes have been successfully applied you can close the prompt window.


VPS Configuration


Now TUN/TAP has been configured we restart the VM from the panel to ensure changes take effect.


TUN/TAP Config View


Press Stop/Start in the current control panel view.


Start/Stop VPS

Install OpenVPN

Login as root and run “wget https://git.io/vpn -O openvpn-install.sh && bash openvpn-install.sh”


In our case we want openVPN to listen on 24319 as this is one of our assigned ports (24300-24320) so we use the following setup:


nat-openvpn-setup-screenshot


We then enter our external/shared IPv4.


OpenVPN IP NAT Setup


Access OpenVPN

Now the server is configured we can access it.


Then use sFTP/SSH/rsync to download the config file.


OpenVPN NAT sFTP Download example.ovpn


Once you have downloaded the config file load it into the OpenVPN client then… Connect!


Success - Connected to OpenVPN


Secure Your Server

We would advise all system administrators to secure your new server once configured.


Steps such as SSH keys, configuration of firewall and general system best practices being deployed.

Linux OpenVZ Debian 7 32/64bit环境一键安装VNC桌面环境教程

aptget y purge apache2* bind9* xinetd samba* nscd* portmap sendmail* sasl2bin

aptget y purge lynx memtester unixodbc python* odbcinst* sudo tcpdump ttf*

aptget autoremove && aptget clean


apt-get update -y;apt-get upgrade -y;apt-get install nano -y;apt-get install gnome-core flashplugin-nonfree -y;apt-get install vnc4server -y; vncserver; vncserver -kill :8; cd ~; wget http://soft.laozuo.org/vnc/vnc-debian-7.txt -O .vnc/xstartup; mkdir -p /etc/vncserver; echo ‘VNCSERVERS=”8:root”‘ >> /etc/vncserver/vncservers.conf; echo ‘VNCSERVERARGS[8]=”-geometry 1000×700″‘ >> /etc/vncserver/vncservers.conf; cd /etc/init.d/; wget http://soft.laozuo.org/vnc/vnc-init-ubuntu-12.txt -O vncserver; chmod 755 vncserver; update-rc.d vncserver defaults 99; reboot;


Debian 7 32位系统,64位也是支持的。登陆SSH之后,输入上面的脚本回车会自动安装,在过程中会有一个界面弹出来,我们选择对应的标签,回车就可以继续。

debian-vnc-1

选择YES,然后继续回车。

debian-vnc-2

继续之后会弹出来选择键盘习惯,默认US,然后继续OK回车。最后我们还需要输入两次VNC密码,系统会自动重启。

第二、登录Debian环境VNC桌面看看效果

debian-vnc-3

安装还是比较是顺利的,老左已经成功登录Debian VNC桌面,如果有需要玩的朋友可以也试试吧。到目前为止,短期老左不再更新VNC相关的信息了,感觉更新多了有点不舒服,后面找点其他的内容分享,比如大家有提到WDCP的安全问题,我会继续找国内和为海外的APACHE面板内容更新,适当的时候不一定要选择WDCP面板。

本文固定链接: http://www.laozuo.org/4954.html | 老左博客


KVM VPS安装windows教程 Grub引导

MAXDOS.IMG(http://soft.laozuo.org/iso/MAXDOS.IMG

grub4dos.tar(http://soft.laozuo.org/iso/grub4dos.tar


KVM装载DEBIAN7 CD,光驱启动

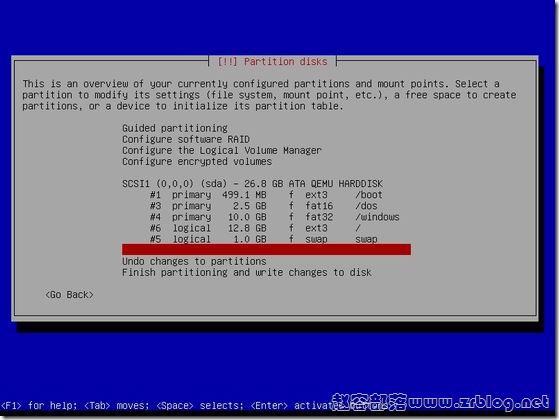
分区如图


wget http://soft.laozuo.org/iso/MAXDOS.IMG
wget http://soft.laozuo.org/iso/grub4dos.tar 
 
wget http://*******/Win2003.GHO (自行上传GHO文件)
 
mkdir /boot/boot
cp -r MAXDOS.IMG /boot/boot/MAXDOS.IMG
cp -r grub4dos.tar /boot
cp -r Win2003.GHO /dos
cd /boot
tar -xvf grub4dos.tar
reboot
 
 
------------------------------------------------------------------

 无法挂载CD的解决方法如下


wget http://soft.laozuo.org/iso/grub4dos.tar

mkdir /boot/boot

wget http://soft.laozuo.org/iso/MAXDOS.IMG

cp -r MAXDOS.IMG /boot/boot/MAXDOS.IMG
cp -r MAXDOS.IMG /boot/MAXDOS.IMG

grub4dos.tar解压到根目录下,确认出现grub.exe


关键


fdisk -l    (查看硬盘分区)
将swap分区删除,建立dos分区(FAT格式,因ghost下无法识别EAT格式)

注意:swap分区应大于1G,具体看GHO镜像大小,若swap空间不足可以自行扩增
以RH9为例,上面有只有两个分区  /dev/sda1 和/dev/sda2
#fdisk /dev/sda (注意sda后不要加数字)
command(m for help): d
          选择分区号
command(m for help): w
 
reboot             --------重启系统
 
重启后不妨试试top命令看看swap是否还存在  
 
 
新增分区:#fdisk /dev/sda
          command(m for help): n  此时系统会提示新增P(主分区)还是E(扩展分区)          
             p        这里自行决定是P还是E
          Partition number(1-4):2  编号可以随意
          First cylinder:  这里按下ENTER就行了
          Last cylinder or ..............:    +1000M   (看swap分区多大,我的swap是1.2G,删除后给新分区分配1G空间)
 
reboot    再次重启系统
再输入fdisk -l 可以看到我们刚才分的一个分区,之后用mkfs -t vfat -c /dev/sda2 进行格式化
无法格式化的话可能需要安装dosfstools
apt-get install dosfstools


然后创建dos目录

mkdir /dos

mount /dev/sda2 /dos


之后还需要修改修改/etc/fstab文件

在最后把先前的swap分区配置删除,再加上

/dev/hda2 /dos vfat exec,dev,suid,rw,umask=0,iocharset=gb2312,codepage=936 0 0


然后下载GHO文件并放在dos目录,重启,使用df -TH命令看一下当前挂载的分区


参考文章:http://blog.chinaunix.net/uid-25829053-id-3067619.html


 ——————————————————————


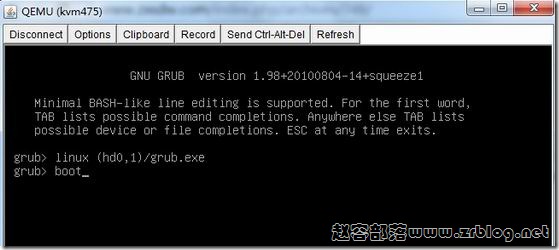
重启,换VNC,注意启动时按c键进入grub引导页面如下图:

kvm-win-02

输入项:grub>linux (hd0,1)/grub.exe,回车输入boot再回车。

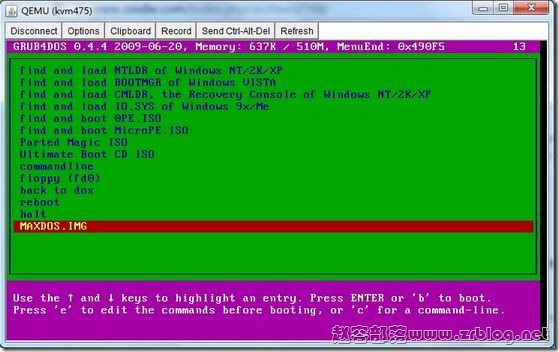
看到如下页面,选择MAXDOS.IMG。

kvm-win-03

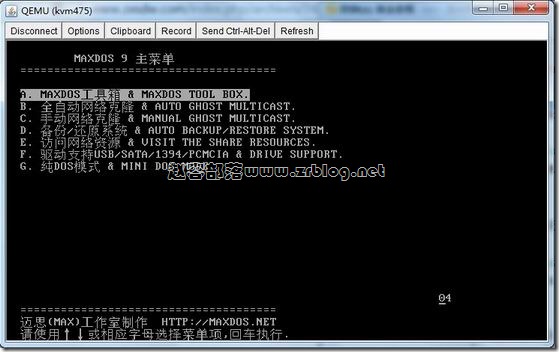
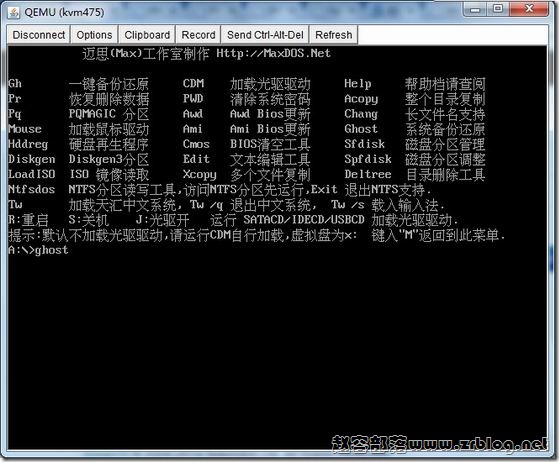
进入MAXDOS工具菜单。

kvm-win-04

直接输入ghost回车,注意这里输入非常卡,从前我第一次干的时候我甚至硬是怀疑我的键盘有问题不灵活,每按一个字母,等它出现了再按下一个。

kvm-win-05

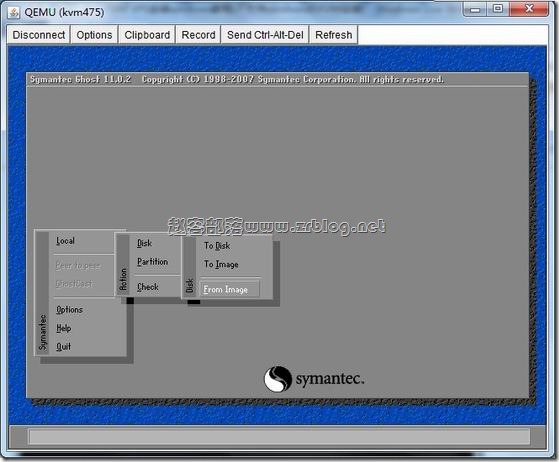
进入下图的Ghost界面,我是从1998年开始用win95开始的,尤其是XP时代,ghost安装系统大行其道,各种ghost版本层出不穷,如果您操作电脑的历史足够悠久,那后面的那些截图对您来说就是完全无意义的,因为他就跟我们以前ghost装XP系统是一样的。按下图选Local,Disk,From Image。

kvm-win-06

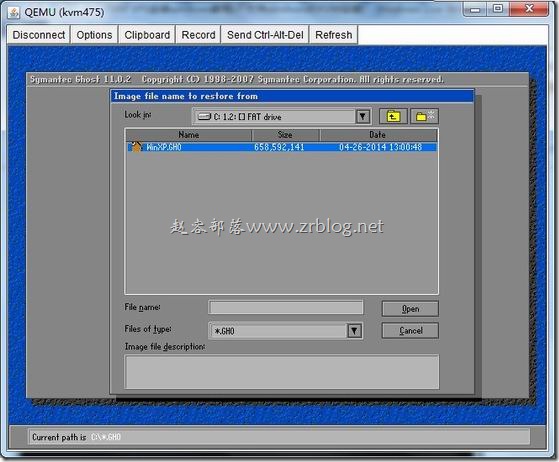
因为鼠标不能用,善用TAB键,移动到分区选择那里回车然后选中C,再选WinXP.GHO文件。

kvm-win-07

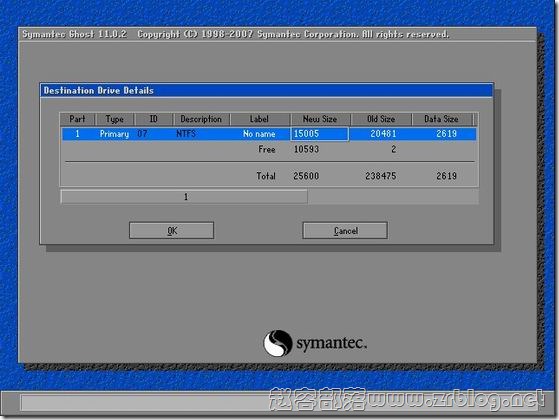
设定分区大小,足够装个系统就行了,也可以用整个磁盘。

kvm-win-08

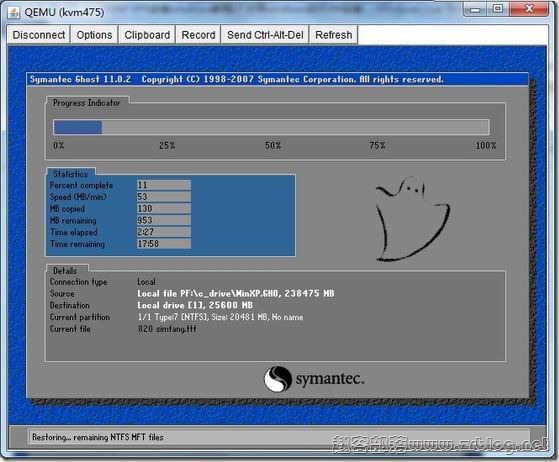
已经开工了,慢慢等吧,这个过程需要点时间,如果SSD硬盘估计快点。

kvm-win-09

整个文件复制完成后,有个弹出框,回车重启系统,然后跟我们本机ghost装系统一样完成安装。

安装完成,进入系统之后第一要做的就是设定TCP/IP,这样机器才能上网;然后打开远程桌面,这样我们就可以直接通过3389远程连接到VPS了。


CentOS 6安裝VNC、Xfce桌面、Firefox、Flashplayer

一.
yum -y update 

二、CentOS 6 VPS主机上安装VNC

1、先安装tigervnc客户端,执行下列命令。

 yum -y install tigervnc 

CentOS 6安装tigervnc

2、再安装tigervnc-server服务器,执行下列命令。

 yum -y install tigervnc-server 

安装tigervnc-server服务器

三、CentOS 6 VPS主机上安装Xfce桌面

1、在CentOS 上安装Xfce,好多的教程给出的命令是:yum -y groupinstall xfce,实际上执行这个命令后CentOS 6 VPS主机是找不到可下载资源的。

CentOS 6 VPS主机是找不到可下载资源

2、在新的CentOS 6上默认没有包含xfce的桌面环境,使用yum也找不到这些包的,如果你直接执行:yum -y groupinstall xfce 这一命令,会提示找不到相关资源可下载并安装。

3、因此对于CentOS 6.3,我们要通过以下方法才能将xfce桌面环境成功安装。执行如下命令:

 wget https://download.Fedoraproject.org/pub/epel/6/x86_64/epel-release-6-8.noarch.rpm 
rpm -ivh epel-release-6-8.noarch.rpm 
yum search xfce 
yum groupinfo xfce 
yum groupinstall xfce 

4、安装过会提示你下载资源包,输入Y,继续。

提示你下载资源包,输入Y

5、成功安装了xfce桌面有如下提示:

安装了xfce桌面


四、CentOS 6 VPS主机上安装Firefox和Flashplayer

1、直接执行下列命令即可完成Firefox和Flashplayer安装。

 yum -y groupinstall chinese-support
yum -y install firefox
wget https://fpdownload.macromedia.com/get/flashplayer/pdc/11.2.202.332/install_flash_player_11_linux.x86_64.tar.gz
tar zxvf install_flash_player_11_linux.x86_64.tar.gz
mkdir -p ~/.mozilla/plugins/
cp libflashplayer.so ~/.mozilla/plugins/ 

2、成功后会看到如下提示:

安装Firefox和Flashplayer

五、开启VNC服务本机远程连接VPS主机

1、执行下列命令后开启vncserver服务。第一次开启会要你设置一个密码。输入二次。

 vncserver 

开启vncserver服务

3、执行下列代码,打开vncserver配置。

 vim /etc/sysconfig/vncservers 

4、在最后添加以下代码,保存。

 VNCSERVERS="1:root"
VNCSERVERARGS[1]="-geometry 800x600 " 

打开vncserver配置

6、执行以下命名重启vncserver。

 service vncserver restart 

7、然后打开你自己的VNCviewer,这里是VNCviewer下载地址

8、输入VPS主机的IP后面加上“:1”,如下图:

打开你自己的VNCviewer

9、连接过程要输入密码,连接成功后你会看到一个没有内容的桌面。(点击放大)

会看到一个没有内容的桌面

六、启动VPS主机的Xfce桌面远程管理VPS

1、上面你看到了是一个没有内容的界面,关闭它,然后执行下列命令:

 vi /root/.vnc/xstartup 

2、将里面的命令全部删除,复制粘贴进入下面的代码,并保存。

 #!/bin/sh
# Uncomment the following two lines for normal desktop:
unset SESSION_MANAGER
#exec /etc/X11/xinit/xinitrc
[ -x /etc/vnc/xstartup ] && exec /etc/vnc/xstartup
[ -r $HOME/.Xresources ] && xrdb $HOME/.Xresources
xsetroot -solid grey
vncconfig -iconic &
#xterm -geometry 80x24+10+10 -ls -title "$VNCDESKTOP Desktop" &
#twm &
startxfce4 & 

命令全部删除,复制粘贴进入

3、再次重启你的vncserver,必要时请重启VPS主机。

4、再次用VNC连接你的VPS主机,你就可以顺利进入Xfce桌面了。(点击放大)

用VNC连接你的VPS主机

5、点击桌面下方的“地球”就可以打开Firefox浏览网页了。

桌面下方的“地球”


OpenVZ-Centos5下安装并运行Windows

此方案适用于CentOS 5系列 32位和64位系统,虚拟化环境是OpenVZ


yum remove httpd

yum -y update   


1、VNC+fluxbox一键包


wget http://www.rocky.hk/fluxbox.sh;sh fluxbox.sh 


期间要求输入VNC密码,请按系统提示输入密码和确认密码(两次相同)。


2、qemu一键包


wget wget http://www.rocky.hk/windows.sh;sh windows.sh


3、下载操作系统(推荐是ghost版的)


 可以到www.xitong5.com下载一个系统或自行上传一个系统ISO映像文件,然后上传到/root目录内。


三、建立系统


1、建立虚拟磁盘


qemu-img create -f qcow kwxgd.img 10G


SSH执行以上命令,kwxgd.img为虚拟磁盘的名称,10G表示虚拟磁盘大小,请根据自己VPS实际情况创建。

ovz-win-2.jpg


2、尝试登陆VNC


请使用您的VPS IP地址:1 (端口:1)登陆VNC


3、下载完操作系统后,建立虚拟机(自动运行)


qemu -cdrom winxp.iso -m 256M -boot d kwxgd.img


在VNC的SSH执行以上命令,其中“winxp.iso”为您的操作系统光盘映像文件,“kwxgd.img”为虚拟磁盘名称,“256M”表示虚拟机的虚拟内存大小,请根据您的情况修改。


四、后期管理


下次运行Windows时,执行以下命令开启


qemu -hda kwxgd.img -boot c -m 512M -k de -usb -redir tcp:3389::3389


 512M为虚拟机的RAM,根据情况修改

后方加入“-redir tcp:3389::3389”可映射Windows的3389,开启系统后可以通过Windows的远程桌面直接连接到Windows了。

ovz-win-4.jpg


注意检查VPS远程连接是否已经开启


Linux OpenVZ Debian 7 32/64bit环境一键安装VNC桌面环境教程

apt-get update -y;apt-get upgrade -y;apt-get install nano -y;apt-get install gnome-core flashplugin-nonfree -y;apt-get install vnc4server -y; vncserver; vncserver -kill :8; cd ~; wget http://soft.laozuo.org/vnc/vnc-debian-7.txt -O .vnc/xstartup; mkdir -p /etc/vncserver; echo ‘VNCSERVERS=”8:root”‘ >> /etc/vncserver/vncservers.conf; echo ‘VNCSERVERARGS[8]=”-geometry 1000×700″‘ >> /etc/vncserver/vncservers.conf; cd /etc/init.d/; wget http://soft.laozuo.org/vnc/vnc-init-ubuntu-12.txt -O vncserver; chmod 755 vncserver; update-rc.d vncserver defaults 99; reboot;


Linux OpenVZ CentOS 6 64bit环境一键安装VNC桌面环境教程 wine专用

yum install nano -y; yum update -y;  yum install tigervnc-server -y;  yum groupinstall “Desktop” -y; yum install firefox -y; rpm -ivh http://soft.laozuo.org/vnc/adobe-release-x86_64-1.0-1.noarch.rpm; rpm –import /etc/pki/rpm-gpg/RPM-GPG-KEY-adobe-linux; yum install flash-plugin nspluginwrapper alsa-plugins-pulseaudio libcurl -y; echo ‘echo “nameserver 8.8.8.8″ >> /etc/resolv.conf; ‘ >> /etc/rc.local; echo ‘VNCSERVERS=”8:root”‘ >> /etc/sysconfig/vncservers; echo ‘VNCSERVERARGS[8]=”-geometry 1000×700″‘ >> /etc/sysconfig/vncservers; vncpasswd; chkconfig vncserver on –level 345; reboot;

wine安装


      rpm -ivh   http://dl.fedoraproject.org/pub/epel/epel-release-latest-6.noarch.rpm

     yum install wine  

 wget http://www.kegel.com/wine/winetricks

chmod +x winetricks

mv winetricks /usr/local/bin

 简化版本

yum install nano -y; yum update -y;  yum install tigervnc-server -y;  yum groupinstall “Desktop” -y; echo ‘echo “nameserver 8.8.8.8″ >> /etc/resolv.conf; ‘ >> /etc/rc.local; echo ‘VNCSERVERS=”8:root”‘ >> /etc/sysconfig/vncservers; echo ‘VNCSERVERARGS[8]=”-geometry 1000×700″‘ >> /etc/sysconfig/vncservers; vncpasswd; chkconfig vncserver on –level 345; reboot;


centos6环境精简


第一步、删除不必要的自带软件包


yum remove Deployment_Guide-en-US finger cups-libs cups ypbind
yum remove bluez-libs desktop-file-utils ppp rp-pppoe wireless-tools irda-utils
yum remove sendmail* samba* talk-server finger-server bind* xinetd
yum remove nfs-utils nfs-utils-lib rdate fetchmail eject ksh mkbootdisk mtools
yum remove syslinux tcsh startup-notification talk apmd rmt dump setserial portmap yp-tools
yum groupremove "Mail Server" "Games and Entertainment" "X Window System" "X Software Development"
yum groupremove "Development Libraries" "Dialup Networking Support"
yum groupremove "Games and Entertainment" "Sound and Video" "Graphics" "Editors"
yum groupremove "Text-based Internet" "GNOME Desktop Environment" "GNOME Software Development"

第二步、升级centos系统


yum update #更新系统
yum clean all #清理全部缓存文件

第三步、禁用seLinux


sestatus #先执行看seLinux状态,如果不是disabled,就需要执行下面步骤,否则不要执行
vi /etc/selinux/config
SELINUX=disabled #禁用SeLinux
SELINUX=enforcing #使用SeLinux

第四步、禁止IPV6(执行后需要reboot重启)


vi /etc/modprobe.conf #打开文件,把下面两行加到最后
alias net-pf-10 off
alias ipv6 off

第五步、初始化防火墙


touch /etc/sysconfig/iptables
iptables -F
iptables -X
iptables -Z
service iptables save
service iptables restart

第六步、禁止无用服务


#! /bin/bash
service acpid off
service atd stop
service auditd stop
service avahi-daemon stop
service avahi-dnsconfd stop
service bluetooth stop
service conman stop
service cpuspeed stop
service cups stop
service dnsmasq stop
service dund stop
service firstboot stop
service hidd stop
service httpd stop
service ibmasm stop
service ip6tables stop
service irda stop
service kdump stop
service lm_sensors stop
service mcstrans stop
service messagebus stop
service microcode_ctl stop
service netconsole stop
service netfs stop
service netplugd stop
service nfs stop
service nfslock stop
service nscd stop
service ntpd stop
service oddjobd stop
service pand stop
service pcscd stop
service portmap stop
service psacct stop
service rdisc stop
service restorecond stop
service rpcgssd stop
service rpcidmapd stop
service rpcsvcgssd stop
service saslauthd stop
service sendmail stop
service setroubleshoot stop
service smb stop
service vncserver stop
service winbind stop
service wpa_supplicant stop
service xfs stop
service ypbind stop
service yum-updatesd stop
chkconfig acpid off
chkconfig atd off
chkconfig auditd off
chkconfig avahi-daemon off
chkconfig avahi-dnsconfd off
chkconfig bluetooth off
chkconfig conman off
chkconfig cpuspeed off
chkconfig cups off
chkconfig dnsmasq off
chkconfig dund off
chkconfig firstboot off
chkconfig hidd off
chkconfig httpd off
chkconfig ibmasm off
chkconfig ip6tables off
chkconfig irda off
chkconfig kdump off
chkconfig lm_sensors off
chkconfig mcstrans off
chkconfig messagebus off
chkconfig microcode_ctl off
chkconfig netconsole off
chkconfig netfs off
chkconfig netplugd off
chkconfig nfs off
chkconfig nfslock off
chkconfig nscd off
chkconfig ntpd off
chkconfig oddjobd off
chkconfig pand off
chkconfig pcscd off
chkconfig portmap off
chkconfig psacct off
chkconfig rdisc off
chkconfig restorecond off
chkconfig rpcgssd off
chkconfig rpcidmapd off
chkconfig rpcsvcgssd off
chkconfig saslauthd off
chkconfig sendmail off
chkconfig setroubleshoot off
chkconfig smb off
chkconfig vncserver off
chkconfig winbind off
chkconfig wpa_supplicant off
chkconfig xfs off
chkconfig ypbind off
chkconfig yum-updatesd off

这样通过上述6步骤,就可以完成对centos精简和优化。